
Table of Contents
- Why Properly Lubricating Your Ball Joints is Non-Negotiable
- Tools & Materials You'll Need: Your Ball Joint Greasing Checklist
- Step-by-Step Guide: How to Grease a Ball Joint with a Grease Gun
- Choosing the Right Grease for Your Ball Joints
- Troubleshooting Common Greasing Problems
- Frequently Asked Questions (FAQ) About Greasing Ball Joints
Why Properly Lubricating Your Ball Joints is Non-Negotiable
Ball joints are the pivotal bearings that connect your vehicle's control arms to the steering knuckles. They are crucial for allowing controlled movement and articulation in your suspension while you steer and drive over bumps. Without proper lubrication, these metal-on-metal components will wear out prematurely due to friction, heat, and contamination.
Regularly greasing your ball joints with a quality grease gun provides a protective film that reduces friction, prevents corrosion, and helps keep out dirt and moisture. This simple act can prevent costly repairs down the line, such as complete ball joint failure, which can lead to a loss of vehicle control—a serious safety hazard.

Tools & Materials You'll Need: Your Ball Joint Greasing Checklist
Before you start, gather all the necessary equipment. Having everything on hand will make the process smooth and efficient.
- Grease Gun: The core tool for this job. A lever-handle or pistol-grip model is ideal for DIYers.
- High-Quality Grease Cartridge: Use a lithium-based or synthetic multi-purpose grease rated for automotive chassis applications. (More on selection later).
- Rag or Shop Towels: For cleaning fittings and wiping up excess grease.
- Safety Glasses: To protect your eyes from any grease that might squirt out.
- Jack and Jack Stands: To safely lift and support the vehicle. Never rely on a jack alone!
- Wire Brush or Fitting Cleaner: To clean dirt and debris from the grease fitting before attaching the gun.
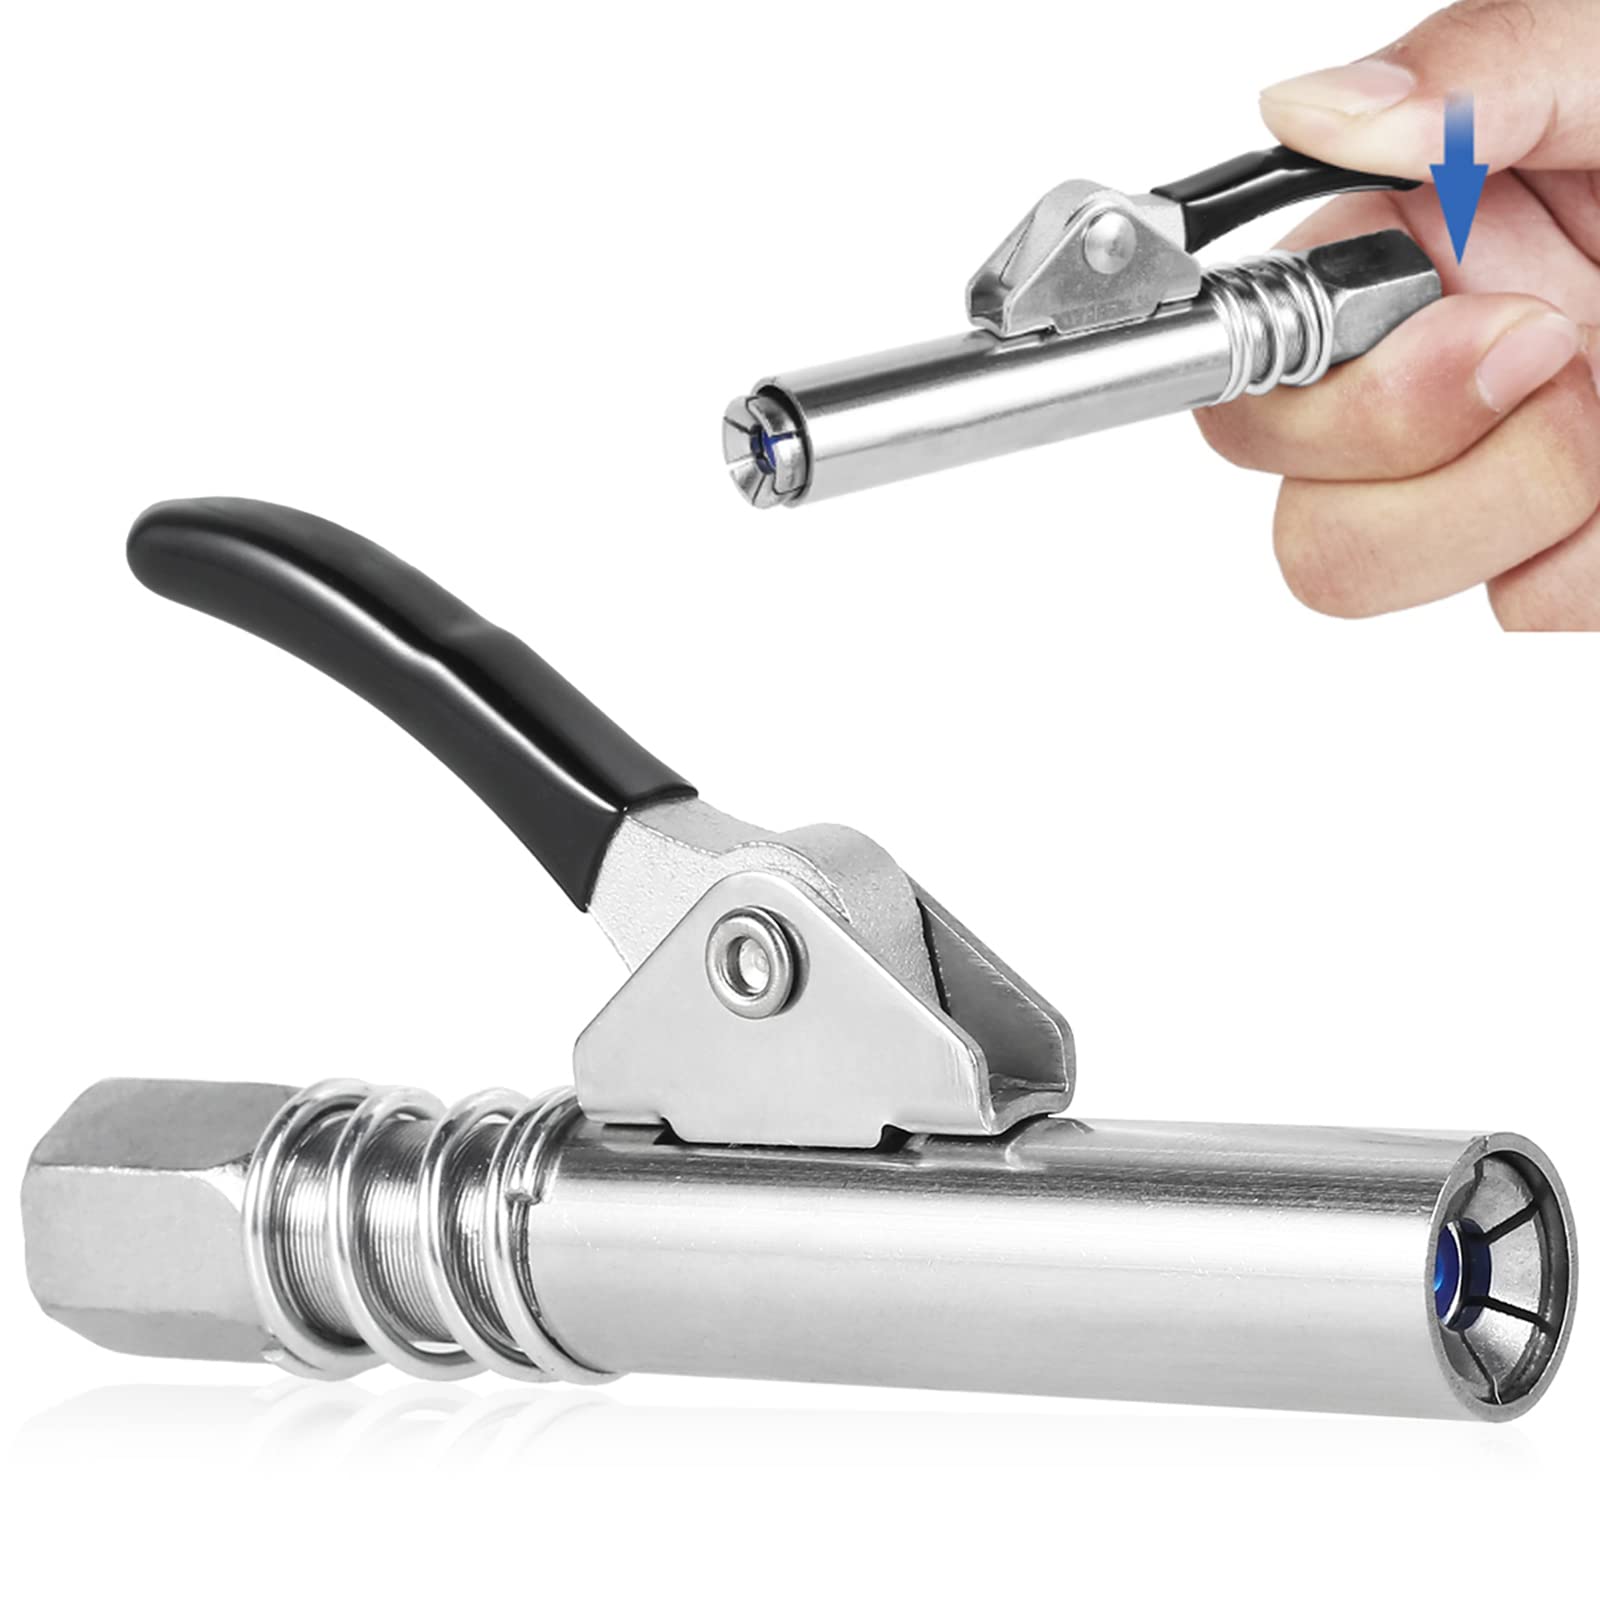
Speaking of the grease gun, the coupler (the part that attaches to the grease fitting) is critical. A poor-quality coupler can leak, fail to seal, or even damage the fitting. For a secure, high-pressure connection that ensures every ounce of grease goes where it's needed, consider our Heavy-Duty Quick-Release Grease Gun Coupler. Rated for 10,000 PSI, it's designed to handle the toughest jobs without leaking.
Step-by-Step Guide: How to Grease a Ball Joint with a Grease Gun
Safety First: Preparing Your Vehicle and Workspace
1. Park on a Level Surface: Engage the parking brake and block the wheels opposite the ones you'll be lifting.
2. Lift the Vehicle: Use a floor jack to lift the corner of the vehicle until the tire is slightly off the ground. This relieves pressure from the ball joint, making it easier for new grease to enter.
3. Support with Jack Stands: This is the most critical safety step. Place jack stands under the vehicle's designated lift points. Slowly lower the jack until the vehicle rests securely on the stands. Give the vehicle a gentle shake to confirm it's stable.

Locate and Clean the Grease Fitting (Zerk Fitting)
Locate the ball joint. The grease fitting, or Zerk fitting, is a small, nipple-like protrusion, usually on the side or bottom of the joint. It's often covered in grime. Use your wire brush or fitting cleaner to thoroughly scrub away all dirt and debris from the fitting. A clean fitting is essential to prevent forcing contaminants into the joint, which would cause more harm than good.
How to Attach Your Grease Gun Coupler to the Fitting
1. Prime the Grease Gun: If it's a new gun, pump the handle until you see grease begin to emerge from the coupler. This removes air from the system.
2. Attach the Coupler: Place the coupler of your grease gun directly over the clean grease fitting. Push it on firmly and straight. A quality coupler, like our Quick-Release model, will click or lock into place with a secure feel, forming a high-pressure seal.
Pro Tip: If the coupler doesn't want to slide on easily, try pulling back the release collar, placing it over the fitting, and then releasing the collar. Wiggle it slightly to ensure it's seated properly.
Pumping the Grease Correctly: How Much is Enough?
This is where many DIYers go wrong. Too little grease offers no protection; too much can damage the seals.
| Symptom / Situation | What to Do | What to Look For |
|---|---|---|
| New Grease Appears | Slowly pump the grease gun handle. You should see the rubber boot around the ball joint begin to inflate slightly, and new, clean grease should start to appear at the seams of the boot. | Look for a change from old, dirty grease to fresh, clean grease. Stop once you see this. |
| The Boot Expands | Stop pumping as soon as the boot shows a slight bulge. The boot should not become taut or look like it's about to tear. 2-3 pumps is often sufficient. | A pliable, slightly expanded boot. Over-greasing is a common mistake that can rupture the seal. |
| Grease Won't Go In | If the handle becomes extremely hard to pump, stop immediately. You may have a clogged fitting or passage. Do not force it, as you could damage the gun or the joint. (See troubleshooting section). | Excessive resistance in the grease gun handle. |
Inspect and Clean Up: The Final Steps
After successfully greasing the joint, carefully remove the grease gun coupler. Most modern couplers have a quick-release mechanism – simply pull back the collar and the coupler will detach smoothly. Wipe away any excess grease from the fitting and the surrounding area with a rag. This prevents dirt from sticking to the grease and forming an abrasive paste. Finally, lower the vehicle from the jack stands and repeat the process for all remaining grease fittings on the vehicle.
Choosing the Right Grease for Your Ball Joints
Selecting the correct lubricant is as important as the greasing process itself. Using the wrong type of grease can lead to inadequate lubrication or even damage the rubber components. For most automotive applications, a lithium-complex based grease with an NLGI grade of 2 is the standard recommendation. These greases offer excellent water resistance, high-temperature stability, and mechanical stability. If you live in an area with extreme temperatures, consider a synthetic grease which performs better in both very high and very low temperatures. Always check your vehicle's owner's manual for specific manufacturer recommendations. Avoid using generic, multi-purpose greases not designed for automotive chassis applications, as they may not provide the necessary protection.
| Grease Type | Best For | Pros | Cons |
|---|---|---|---|
| Lithium-Complex (NLGI 2) | Most common vehicles, standard conditions | Excellent all-around performance, good water resistance | May not be ideal for extreme temperatures |
| Synthetic Grease | High-performance vehicles, extreme temperatures | Wide temperature range, long-lasting | More expensive |
| Calcium Sulfonate | Marine or high-moisture environments | Exceptional water washout resistance, corrosion protection | Can be harder to find |
Troubleshooting Common Greasing Problems
Even with the right technique, you might encounter issues. Here’s how to solve the most common problems when using your grease gun on ball joints.
- Problem: Grease won't pump into the fitting. This is often caused by a clogged grease fitting. Try replacing the fitting (they are inexpensive and easy to swap out). It could also be a clogged passage in the joint itself, which is more serious and might indicate the need for replacement.
- Problem: Grease gun coupler keeps slipping off. This usually indicates a worn-out coupler or a damaged fitting. Inspect both. Upgrading to a high-quality coupler like our 10,000 PSI model can solve this by providing a superior grip.
- Problem: Grease is coming out from under the coupler, not going into the fitting. This is a sign of a poor seal. Ensure the fitting is clean and the coupler is pushed on straight and firmly. A worn coupler seal is the most likely culprit.
- Problem: Grease gun handle is hard to pump, but no grease is flowing. This could mean the grease gun is not properly primed, the cartridge is empty, or there is a blockage in the gun itself. Check the primer and the cartridge first.
Frequently Asked Questions (FAQ) About Greasing Ball Joints
1. How often should I grease my ball joints?
The general rule of thumb is at every oil change, or every 5,000 to 7,000 miles. However, you should always consult your vehicle's owner's manual for the manufacturer's specific recommendation. If you frequently drive on dusty, rough roads or in wet conditions, you may need to do it more often.
2. Can I over-grease a ball joint?
Absolutely yes. Over-greasing is a common error. Putting too much grease into the joint can cause the rubber boot to swell and rupture. Once the boot is torn, it can no longer keep contaminants out, leading to rapid wear and joint failure. A slight bulge in the boot is perfect; a tight, balloon-like appearance is too much.
3. What if my car doesn't have grease fittings?
Many modern vehicles are equipped with "sealed-for-life" or maintenance-free ball joints. These are pre-lubricated at the factory and do not have Zerk fittings for servicing. Their lifespan is designed to be long, but when they wear out, the entire component must be replaced. You cannot add a grease fitting to these units.
4. The grease gun coupler won't stay on the fitting. What's wrong?
This usually indicates a worn-out coupler or a damaged grease fitting. The internal jaws of the coupler may be worn and can no longer grip the fitting securely. This is a sign that it's time to upgrade to a more reliable coupler, like our heavy-duty quick-release coupler, which provides a superior grip and seal.
5. Is there a difference between greasing a lower ball joint and an upper ball joint?
The process is identical. The main difference is their location on the control arm. Be sure to locate and grease both if your vehicle has both upper and lower joints. Some vehicles may only have one or the other.
Conclusion: Mastering the skill of how to grease a ball joint with a grease gun empowers you to take charge of your vehicle's maintenance, saving you money and ensuring your safety on the road. With the right tools, like a dependable grease gun and a secure coupler, this job becomes a quick and satisfying DIY task. Remember, a well-lubricated suspension is a happy and long-lasting one!
Ready to upgrade your greasing experience? Check out our High-Pressure Quick-Release Grease Gun Coupler for a leak-free, secure connection every time.


Comments
Leave a comment