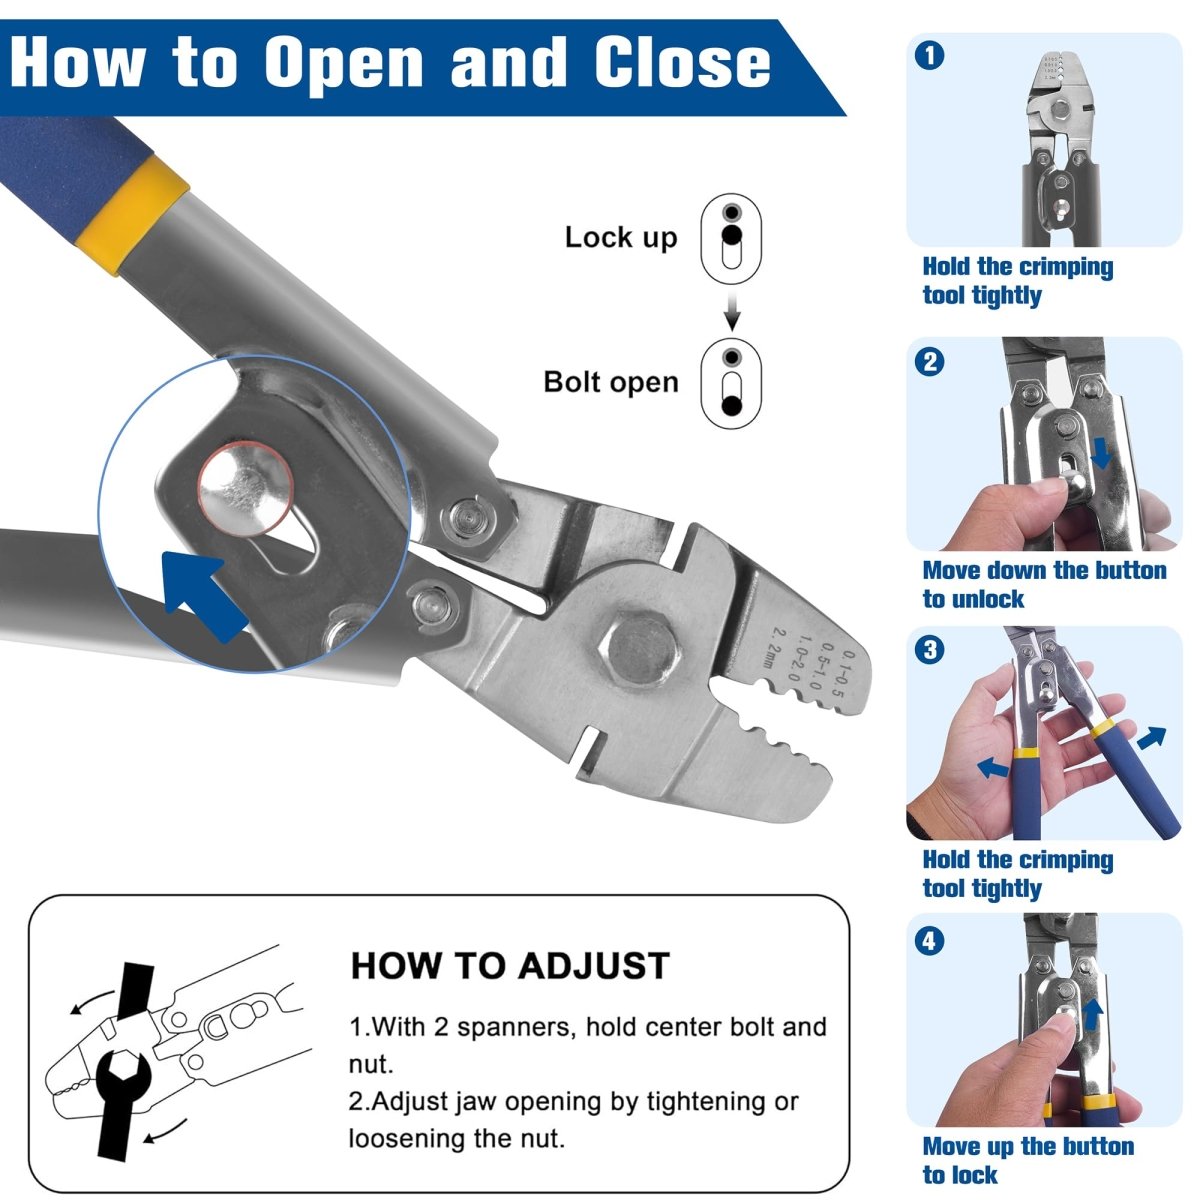
A proper Crimping Swaging Tool is essential for making reliable wire rope assemblies. Whether you are a professional or DIY enthusiast, understanding how to avoid common mistakes ensures safety, durability, and professional-quality results.
Check our full kit: Wire Rope Crimping Kit 600pcs Ferrules & Swaging Tool.
Why Proper Swaging Matters
Wire rope assemblies are widely used in construction, industrial lifting, rigging, marine applications, and DIY projects. A swage or crimp connection forms a permanent, strong, and reliable bond between the ferrule and the wire rope. Using a Crimping Swaging Tool incorrectly can lead to:
- Premature failure of the wire rope
- Load imbalance and safety hazards
- Increased maintenance costs
- Poor aesthetic and functional quality
Understanding the physics of crimping, ferrule selection, and tool handling is essential for professionals and hobbyists alike.

Types of Crimping Swaging Tools
There are multiple types of swaging tools designed for different ferrule sizes and wire rope diameters:
| Tool Type | Description | Applications |
|---|---|---|
| Manual Hand Swager | Hand-operated, portable, suitable for small to medium ferrules | DIY, light-duty wire ropes, crafts |
| Hydraulic Swager | Powered for large diameter ferrules and heavy-duty applications | Industrial lifting, marine rigging, and construction |
| Bench Press Swager | Mounted tool, precise crimps with consistent pressure | Workshop and production lines |
| Battery-Powered Swager | Portable and efficient, it reduces operator fatigue | Fieldwork, outdoor installation, maintenance crews |
Materials and Wire Rope Considerations
Proper swaging depends on matching ferrule material, wire rope type, and load requirements. Common ferrule materials include:
| Material | Properties | Recommended Applications |
|---|---|---|
| Aluminum | Lightweight, corrosion-resistant, easy to crimp | Small diameter wire ropes, marine environments, decorative applications |
| Copper | Malleable, excellent conductivity, corrosion-resistant | Electrical cable, decorative, non-load bearing applications |
| Stainless Steel | High strength, corrosion-resistant, durable | Outdoor, marine, industrial lifting, heavy load-bearing wire ropes |
| Galvanized Steel | Strong, cost-effective, moderate corrosion resistance | Construction, general rigging, and industrial uses |
Wire rope characteristics to consider:
- Diameter and strand count
- Load rating and breaking strength
- Environmental exposure (corrosion, UV, chemicals)
- Flexibility vs rigidity for intended application
Installation Techniques
Proper installation ensures the mechanical integrity of the crimp. Key steps:
- Measure and cut the wire rope to the exact length.
- Insert ferrule, ensuring full contact with wire strands.
- Align tool jaws properly; uneven crimping reduces strength.
- Apply consistent pressure with a tool type suited to the ferrule and wire rope diameter.
- Verify crimp using a pull test or tension gauge.

Common Mistakes When Using a Crimping Swaging Tool
Even experienced operators can make mistakes. The following are the most frequent errors:
| Mistake | Impact | Prevention |
|---|---|---|
| Incorrect ferrule size | Crimp fails, wire strands slip | Always match ferrule diameter to wire rope |
| Uneven crimping | Partial compression, reduced strength | Check alignment and apply uniform pressure |
| Over-crimping | Deforms the ferrule, weakens the wire strands | Follow the tool manufacturer's recommended pressure |
| Under-crimping | Ferrule loosens over time | Use proper crimp setting and repeat if necessary |
| Not inspecting the crimp | Hidden failure points | Always perform a visual and a pull test |
| Using worn or damaged tools | Inconsistent crimps, tool failure | Inspect tools regularly and replace worn parts |
| Wrong wire type | The ferrule cannot grip the strands | Check wire rope specifications before crimping |
By understanding these mistakes, you ensure safety and reliability in all wire rope assemblies.
Comparison Table: Common Crimping Errors vs Best Practices
| Error | Consequence | Correct Approach |
|---|---|---|
| Wrong Ferrule Material | Corrosion, premature failure | Choose material based on the environment |
| Misaligned Tool | Deformed ferrule, weak joint | Check the tool jaws' alignment before crimping |
| Excessive Force | Wire strands crushed | Use the recommended tool setting |
| Insufficient Force | Ferrule slips | Check the crimp visually and perform a pull test |
| Skipping Inspection | Hidden defects | Always inspect crimps before use |
Case Studies of Crimp Failures and Successes
Practical examples help illustrate the importance of proper technique. Consider these scenarios:
Marine Rigging
A sailing vessel installed stainless steel ferrules using a worn hand swager. After one month, several lines failed under load. Correct practice would have used a hydraulic swager with regular inspection.
Industrial Lifting
A crane assembly used aluminum ferrules for heavy steel cables. Under-crimping led to slippage. Switching to the proper ferrule and performing a pull test prevented accidents and improved safety.
Frequently Asked Questions (FAQ)
1. Can I reuse ferrules?
No. Once crimped, ferrules deform permanently. Always use new ferrules for each installation.
2. What is the best tool for small wire ropes?
A manual hand swager or battery-powered crimping tool is ideal for diameters below 6mm.
3. How do I check a crimp?
Visually inspect for even compression and perform a pull test using a tension gauge or test rig.
4. What ferrule materials are most durable outdoors?
Stainless steel ferrules resist corrosion and maintain strength in marine or outdoor conditions.
5. Can I crimp more than one ferrule at a time?
No. Always crimp one ferrule at a time to ensure correct pressure and alignment.
Conclusion
Using a Crimping Swaging Tool correctly is a mix of choosing the right ferrule, selecting the proper tool type, applying the correct technique, and performing rigorous inspection. Avoiding common mistakes ensures the longevity, safety, and reliability of wire rope assemblies.
For a complete kit with 600 pcs ferrules and a high-quality swaging tool, check our product here: Wire Rope Crimping Kit 600pcs Ferrules & Swaging Tool.

Advanced Techniques for Using a Crimping Swaging Tool
Once basic crimping techniques are mastered, you can adopt advanced methods to ensure precision and longevity of wire rope assemblies:
- Multiple Pass Crimping: For thicker ferrules, performing two consecutive crimps ensures full compression without over-crushing the strands.
- Incremental Pressure Application: Gradually increasing tool pressure helps prevent ferrule deformation and uneven compression.
- Use of Dummy Test Strands: Practicing on scrap wire ropes before final installation helps refine technique and prevent mistakes on the main assembly.
- Torque-Verified Tools: For hydraulic and battery-operated swagers, always calibrate the tool to the recommended torque settings.
- Ferrule Lubrication: Minimal lubrication for stainless steel ferrules can prevent galling and ensure a smoother crimp.
Inspection Tips for Long-Term Reliability
Even perfectly crimped assemblies require periodic inspection to maintain safety. Recommended inspection procedures:
- Visual inspection for cracks, deformation, or corrosion.
- Check for ferrule slippage by lightly pulling the wire rope.
- Ensure there are no frayed or broken strands near the crimp.
- Document inspection intervals for industrial applications.
Tip: Keep a maintenance log including crimp dates, ferrule materials, and wire rope specifications.
Common Applications of Crimping Swaging Tools
Understanding where swaging tools are commonly used helps contextualize the importance of proper technique:
- Marine and Boating: Rigging lines, lifelines, and anchoring systems require corrosion-resistant ferrules and precise crimps.
- Industrial Lifting and Hoisting: Steel cables used in cranes and elevators depend on high-strength crimps for safety.
- Construction: Temporary and permanent supports, scaffolding cables, and tie-downs.
- DIY Projects: Wire rope art, furniture, and decorative applications benefit from smaller hand-operated crimping tools.
- Electrical Applications: Crimped copper ferrules for electrical wire assemblies.
Selecting the Right Crimping Swaging Tool
Choosing the right swaging tool is essential to avoid common mistakes. Consider:
| Tool Type | Advantages | Recommended Use |
|---|---|---|
| Manual Hand Swager | Portable, affordable, easy to use | Small to medium ferrules, DIY projects |
| Hydraulic Swager | High power, consistent crimps, minimal operator effort | Large ferrules, industrial lifting cables |
| Battery-Operated Swager | Portable, efficient, reduces fatigue | Fieldwork, outdoor installation |
| Bench-Mounted Swager | Precision and repeatability | Workshop production lines |
Troubleshooting Crimping Issues
Even with the correct tool, issues can occur. Common troubleshooting steps include:
- Ferrule Slippage: Ensure proper ferrule size and verify crimp pressure.
- Wire Strand Damage: Check for over-crimping or incorrect wire alignment.
- Uneven Crimp: Adjust tool alignment and check for wear in tool jaws.
- Corrosion or Surface Damage: Use stainless steel ferrules in marine or chemical environments.
- Tool Failure: Perform routine maintenance, lubricate moving parts, and replace worn components.
Extra Tips for Professional Results
- Always measure and mark wire rope before cutting.
- Keep ferrules organized by size and material for easy selection.
- Use gloves and safety glasses to prevent injury.
- Label finished assemblies for maintenance tracking.
- Store tools in a dry environment to prevent rust and maintain calibration.
Visual Reference: Correct vs Incorrect Crimps
Visual inspection is one of the best methods to identify mistakes early. Look for:
| Visual Feature | Correct Crimp | Incorrect Crimp |
|---|---|---|
| Ferrule Shape | Evenly compressed, uniform oval shape | Uneven, distorted, or cracked |
| Wire Strands | All strands secure, no fraying | Strands protruding, frayed, or damaged |
| Tool Marks | Minimal tool marks, consistent across the ferrule | Deep scratches, uneven marks |
| Crimp Length | Within the recommended range | Too short or overextended |
Final Words on Mastering a Crimping Swaging Tool
Mastering crimping techniques requires practice, attention to detail, and proper tool selection. Avoiding common mistakes ensures safety, durability, and professional-quality results. By combining knowledge of materials, tools, techniques, and inspection methods, you can achieve consistent, reliable wire rope assemblies.
Get started today with our Wire Rope Crimping Kit 600pcs Ferrules & Swaging Tool and experience professional results for yourself.


