🔥 Product Overview
The Adjustable Temperature Leather Edging Iron (also known as an electric soldering iron for leather) is a specialized tool for finishing, creasing, and sealing leather edges. Whether you are making a wallet, belt, bag, or any hand-stitched leather item, this electric iron helps you achieve professional-looking edges – smooth, glossy, and perfectly creased. It works by applying controlled heat to brass tips, which then melt edge wax or burnish the leather fibers.
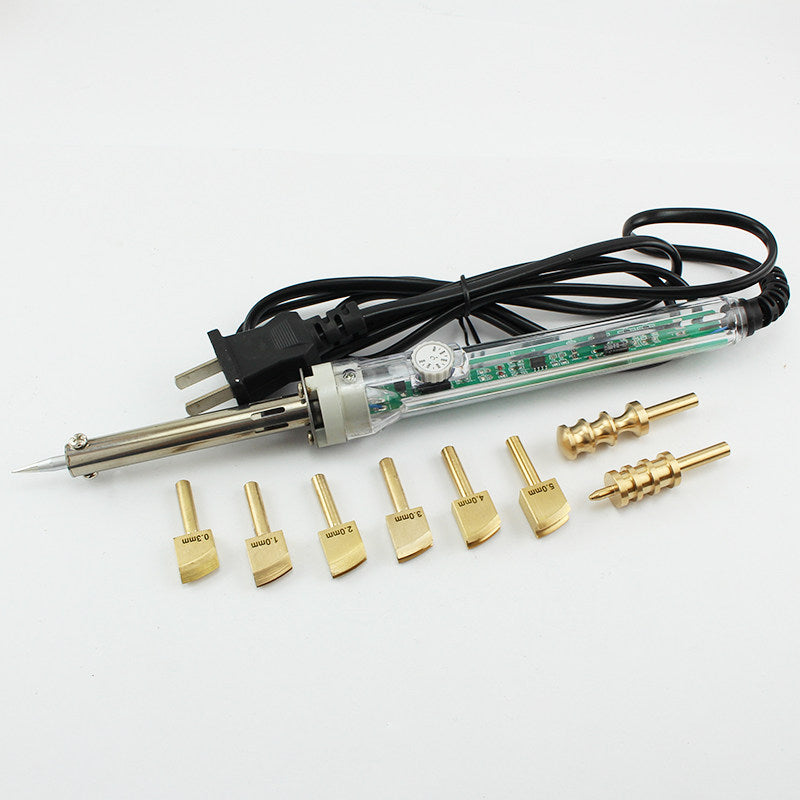
This kit includes the adjustable‑temperature soldering iron base plus a selection of interchangeable brass edging heads: flat-bottom tips (3mm/4mm/5mm) for straight edges on belts and long flaps, curved slot tips (4mm/7mm/8mm) for rounded edges, and narrower creasing tips (1-2mm) for decorative stitch lines. The brass construction ensures even heat distribution, while the temperature dial lets you match the heat to different leather types and finishing methods – from melting wax to burnishing veg‑tan edges.
✨ Key Features & Benefits
- ✔️ Adjustable Temperature Control – Dial in the exact heat needed for different leathers and finishes. Lower for chrome‑tan (to avoid scorching), higher for veg‑tan wax melting. No more guesswork with fixed‑temperature irons.
- ✔️ Brass Edging Heads (Good Thermal Conductivity) – Brass heats evenly and holds temperature consistently, transferring heat smoothly to the leather surface. Results in clean, uniform creases and edge seals.
- ✔️ Interchangeable Tips – Flat & Curved Slot Profiles – Flat‑bottom tips (3/4/5mm) for belt edges, bag flaps, and long straight seams. Curved slot tips (4/7/8mm) for rounded bag corners and curved edge sealing. One iron handles all.
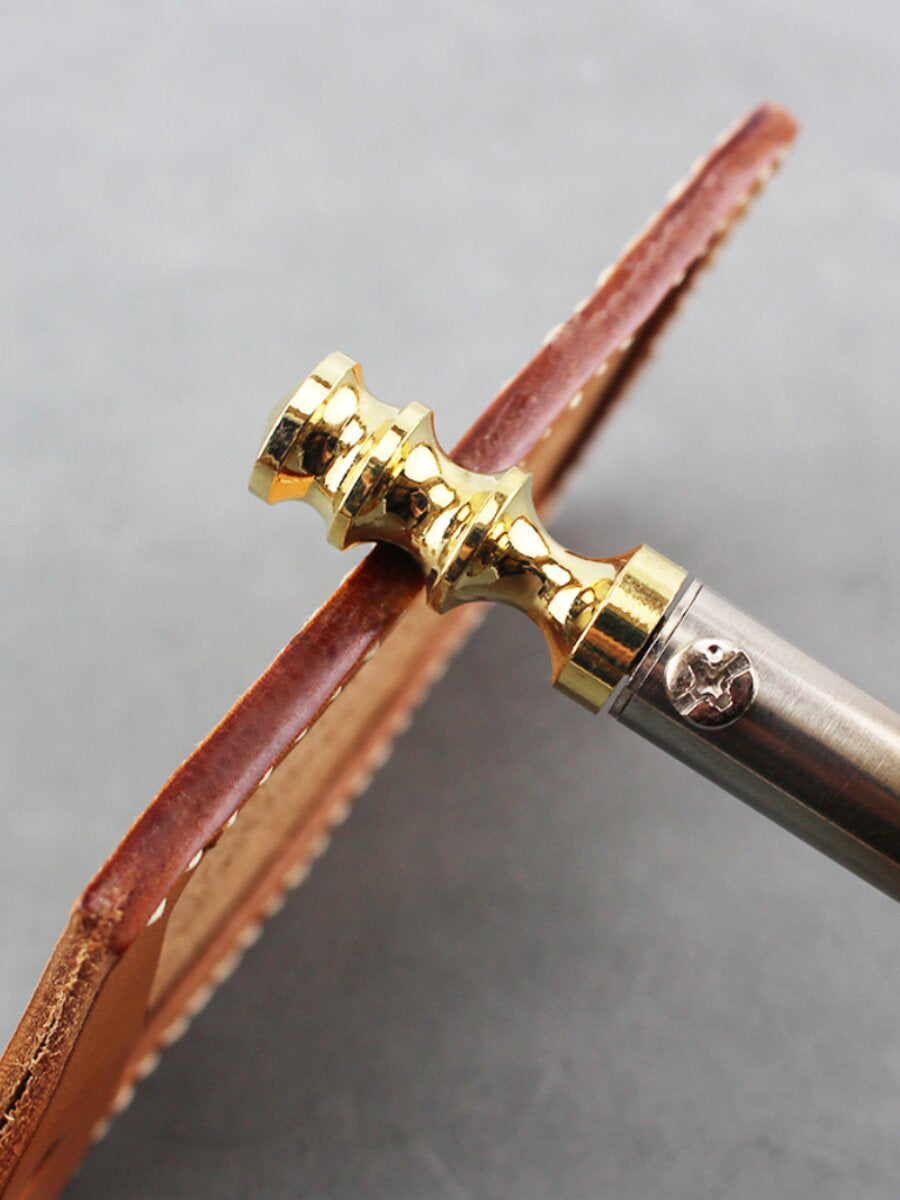
- ✔️ Narrow Creasing Tips (1mm–2mm) for Decorative Lines – Press decorative stitch lines or border grooves on card slots, wallets, and journal covers. Adds a refined, handmade look.
- ✔️ Ideal for Edge Wax Penetration – After applying edge wax or sealing liquid, the heated tip melts the wax deep into the leather fibers, creating a durable, water‑resistant edge that stays glossy.
- ✔️ Safe First‑Time Heating Note – Initial smoke (normal) and darkening of the heating rod are expected and not defects. Designed for hobbyist use with proper precautions.
🧵 Ideal For These Leather Projects & Finishing Tasks
Leather Wallet Edge Finishing
Belt Edge Sealing & Burnishing
Bag Flap Creasing & Decorative Lines
Card Slot Stitch Line Grooving
Journal Cover Border Embossing
Holster Edge Wax Penetration
Watch Strap Edge Smoothing
Key Fob Edge Sealing
Curved Leather Edge Treatment
Leather Repair – Re‑glazing Worn Edges
🔧 Compatibility Guide
✔ Compatible With:
- ✔️ Vegetable Tanned Leather (best for hot wax sealing & burnishing)
- ✔️ Chrome Tanned Leather (use lower temperature, test first)
- ✔️ Genuine Leather & Top Grain
- ✔️ Leather edge wax / edge paint / gum tragacanth (heat can set some finishes)
- ✔️ Flat & curved edge profiles – tips available for both
✘ Not Recommended For:
- ✘ Faux leather / PU leather (will melt or burn)
- ✘ Suede or nubuck (texture will be damaged by heat)
- ✘ Wet leather (steam can cause burns; work on dry leather)
- ✘ Use as a general soldering iron for electronics (tips are leather‑specific)
📐 Product Specifications
| Product Name |
Adjustable Temperature Leather Edging Iron (Electric Soldering Iron for Leather) |
| Material (Heads) |
Brass (good thermal conductivity) |
| Heating Rod Material |
Metal alloy (may darken with use – normal) |
| Temperature Control |
Adjustable dial (specific range not listed, but suitable for edge wax melting) |
| Included Tip Types |
Flat-bottom slot (3mm,4mm,5mm), Curved slot (4mm,7mm,8mm), Narrow creasing tips (1mm,2mm options), plus others as per set |
| Tip Dimensions |
Flat: 3/4/5mm width; Curved: 4/7/8mm radius; Creasing: 1mm, 2mm |
| Power Supply |
110‑220V (standard US plug assumed) |
| Quantity in Set |
Base unit + 8 interchangeable brass heads (typical full set) |
| Weight |
Approx. 250g (iron only, excluding tips) |
| Package Contents |
1x Adjustable temperature soldering iron, 8x brass edging/creasing tips (variety as ordered), 1x stand (if included), user notes |
✍️ How to Use – Professional Edge Finishing in 5 Steps
-
Prepare your leather edge – Sand the edge smooth with progressively finer grit sandpaper (optional: apply edge beveler first). For wax sealing, rub a block of edge wax along the edge.
-
Select and attach the correct brass tip – Use flat-bottom tips (3‑5mm) for straight edges on belts, straps, and bag flaps. Use curved slot tips (4‑8mm) for rounded edges. Use 1‑2mm narrow tips for decorative stitch lines or card slot borders.
-
Heat the iron to the appropriate temperature – Plug in and set the dial. For veg‑tan wax sealing, start around medium‑high (test on scrap). For chrome‑tan, use lower heat to avoid scorching. The brass tip will take 1‑2 minutes to fully heat.
-
Apply the heated tip to the leather edge – Run the tip along the edge with gentle, even pressure. For flat edges, keep the tip perpendicular. For curved slots, align the groove over the edge. Move at a consistent speed to avoid burning or uneven melting. The wax will liquefy and absorb into the fibers.
-
Finish and clean – Allow the edge to cool, then buff with a canvas cloth for a glossy shine. Wipe any residue from the brass tip while still warm (use a rag or brass brush). Unplug the iron and let it cool on its stand.
💡 Note: When heating the iron for the first time, some smoke may appear – this is normal and stops after a few minutes. The heating rod may darken with use; this does not affect performance.
❓ Frequently Asked Questions
Q: Why does the iron smoke when I first turn it on?
A: This is normal. Residual oils from manufacturing burn off during the first heating. The smoke will stop after a few minutes. Ensure good ventilation and allow the iron to run for 5‑10 minutes before first use.
Q: The heating rod turned dark / black – is it defective?
A: No. The metal heating rod naturally oxidizes and changes color when heated. This is expected and does not impact the iron’s performance or safety.
Q: What temperature should I use for vegetable‑tanned leather edge wax?
A: Start around 300‑350°C (if you have a dial reference). On a basic adjustable iron, set to medium‑high. Test on a scrap piece: the wax should melt smoothly without bubbling or smoking. If the leather darkens too quickly, lower the temperature.
Q: Can I use this iron on chrome‑tanned leather?
A: Yes, but with caution. Chrome‑tan is more heat‑sensitive. Use a lower temperature and move the tip quickly. It works best for creasing decorative lines rather than melting heavy wax. Always test on a hidden area first.
Q: Which tip should I use for card slot decorative lines?
A: Use the narrow creasing tips – 1mm or 2mm width. Run them along the marked stitch line before punching holes. The heat creates a subtle groove that guides stitching and looks elegant.
Q: Can I use edge paint with this iron?
A: Edge paint (liquid) is not typically heated with a direct iron – it can bubble. This iron is intended for solid edge wax, gum tragacanth burnishing (with heat assist), or dry creasing. For paint, use a dedicated edge paint applicator and a heat gun.
Q: How do I clean the brass tips after use?
A: While still warm (but unplugged), wipe with a folded piece of leather or a brass brush. Stubborn wax can be removed with a soft cloth and a little isopropyl alcohol. Do not submerge the hot tip in water.
⭐ Why Leather Crafters Choose This Edging Iron
DIY Friendly – No need for a separate edge burnisher or wax melting pot. One electric tool does it all.
Reliable Quality – Brass heads for even heat, adjustable temperature for control.
Suitable for Beginners & Professionals – Achieve clean, glossy edges without years of practice.
Practical for Everyday Projects – From small wallets to large totes, edge finishing makes your work stand out.
Versatile Tip Selection – Flat, curved, and narrow creasing tips included to handle any edge shape.
📦 Ready to give your leather projects a professional edge finish? Add the Adjustable Temperature Leather Edging Iron to your cart today.